
Storing Config Values in Azure
In this article, we will demonstrate 2 primary ways of storing secrets data or configuration information for applications deployed to Microsoft Azure:
- Azure App Service Configuration
- Azure Key Vault
In a previous post, we learned about keeping user secrets out of our code and out of config files that should not be checked into a code repository, particularly during development. In that post, we demonstrated how to use environment variables to set values on a server so that our code could get the config values it needed when it was deployed.
In this post, we will learn about alternative ways to store those values in Azure (if you deploy there) to support App Services, Functions, etc. using App Service Configuration and Azure Key Vault.
Azure App Service Configuration
First, we are assuming that you have already created an Azure App Service instance and likely have deployed an application and are now awaiting a way to set environment variables or other secrets in the deployed configuration. If not, you can check out the blog post on "easy deploy to Azure App Service".
Navigate to the Azure Portal at https://portal.azure.com and login to your subscription.
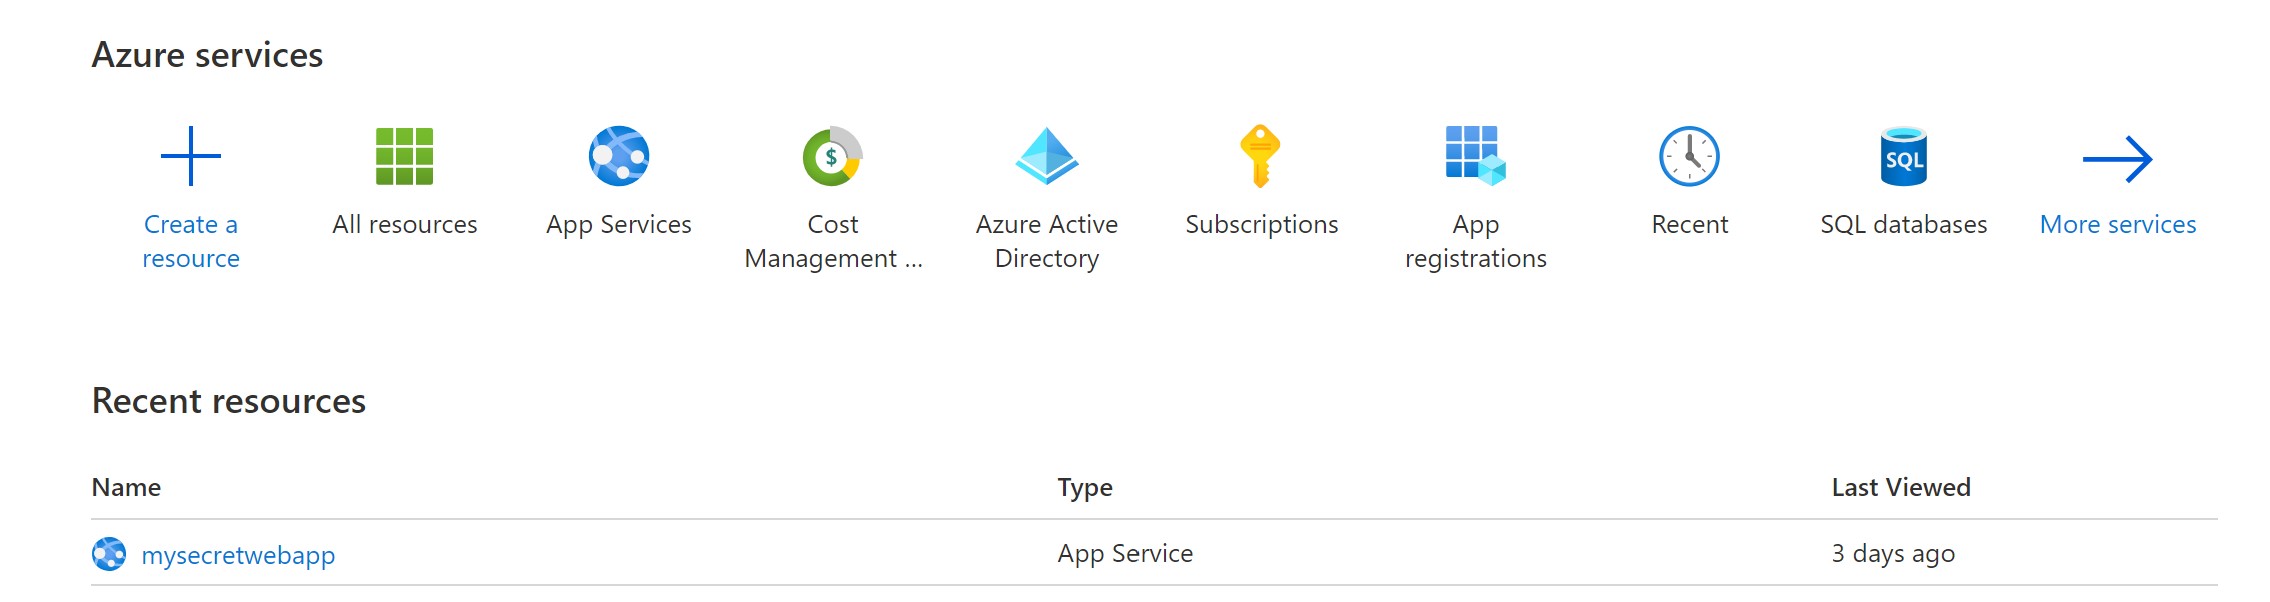
Locate the app service on the portal. Mine is labeled "mysecretwebapp". Click the name to open the app service portal page.
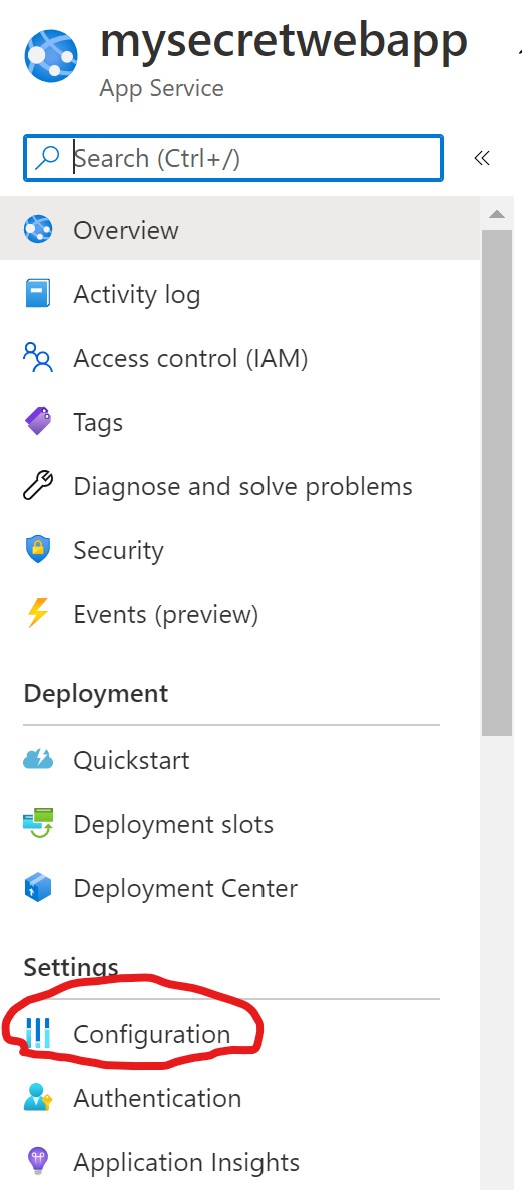
Here you will see the left side navigation bar with several options. Under the settings section, locate and click "Configuration".

The configuration panel is divided into 4 tabs:
- Application settings
- General settings
- Default documents
- Path mappings
We are interested in the first tab for this exercise, "Application settings".
Add New Key/Value Pair
On this tab, there are two sections "Application settings" and "Connection strings". We will add a custom key/value pair to the first section. To do this, click the "+ New application setting" link.
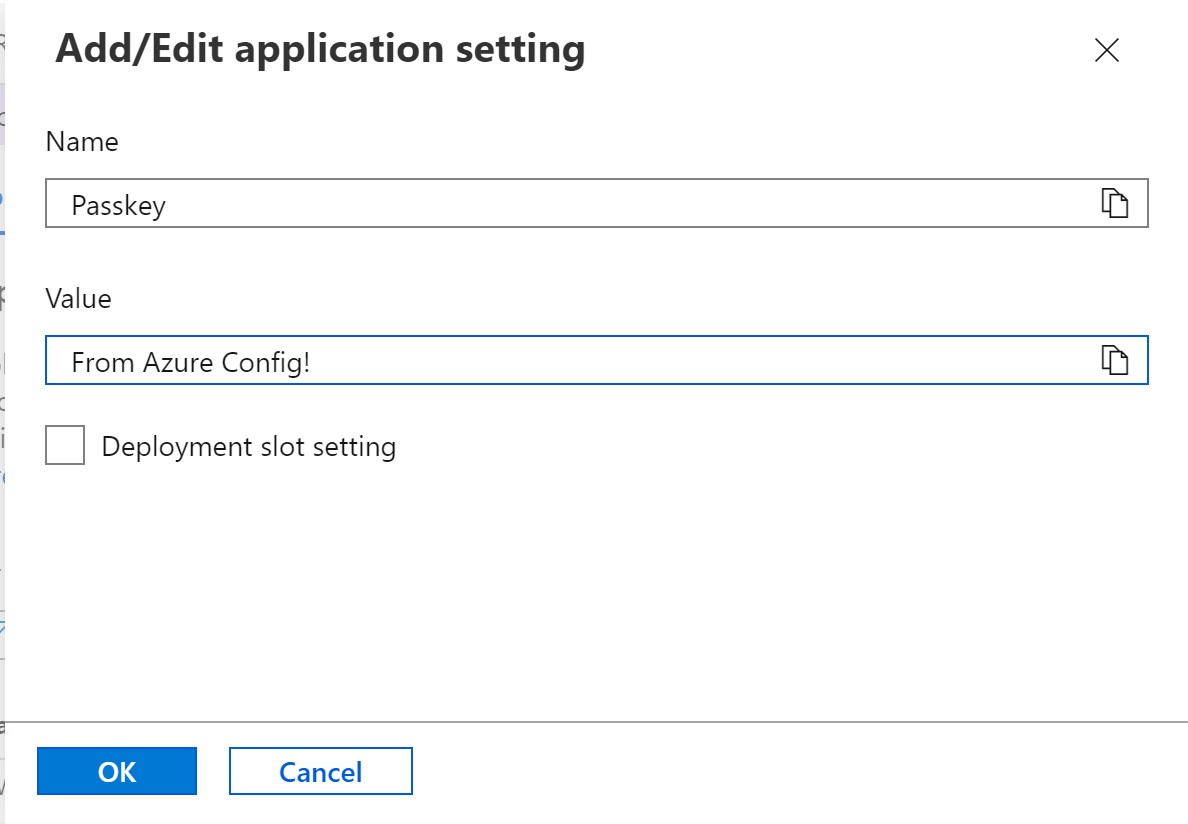
The Add/Edit panel will appear. I added a key of "Passkey" with a value of "From Azure Config!" as depicted above. Then click the 'OK' button. Because we are using a free tier, we don't have access to deployment slots, so you can ignore the "Deployment slot setting" checkbox. If you had a deployment slot, such as a "staging" instance, you could assign the key to a specific slot.
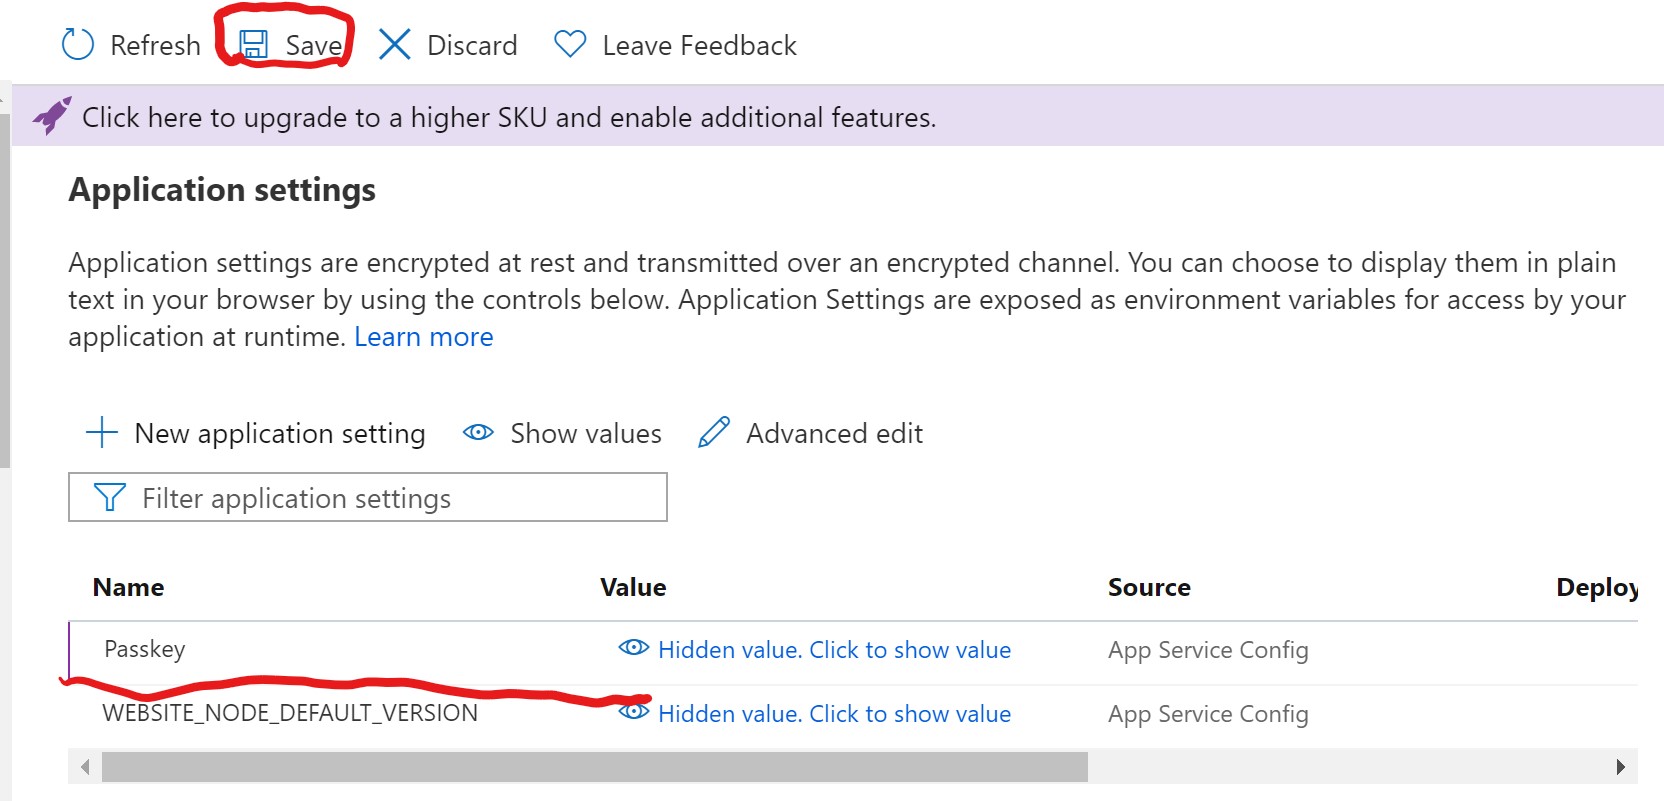
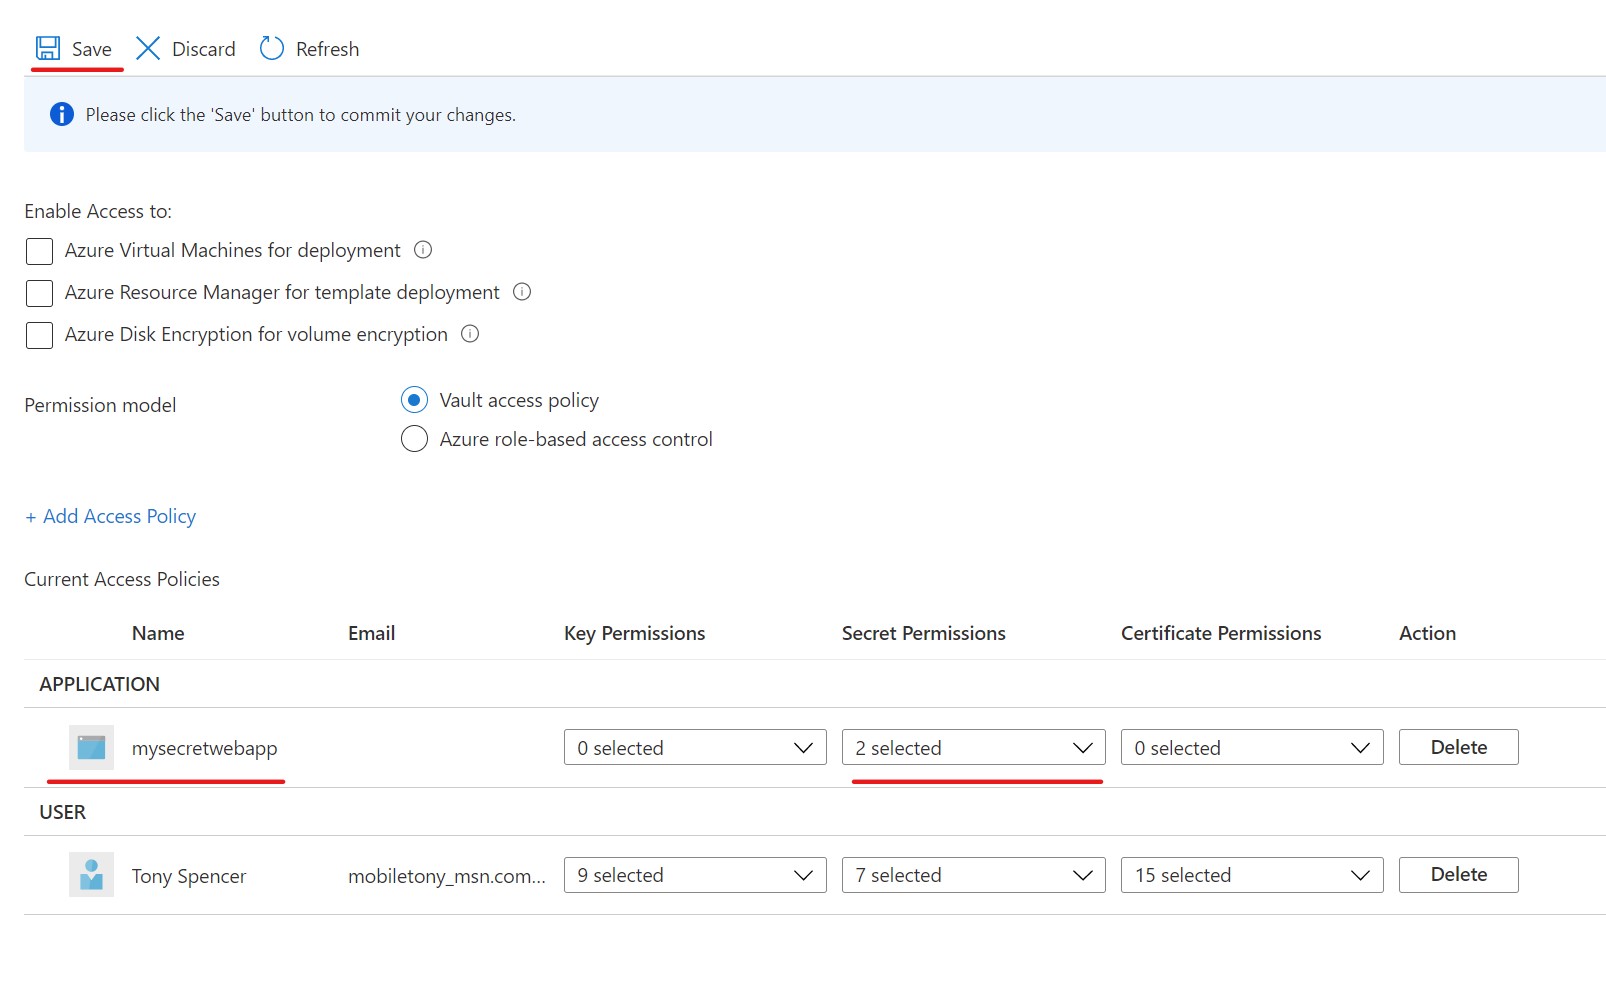
Once you have added your new key/value pair, it will appear in the configuration panel, HOWEVER, you must click the save button at the top of the panel to apply the key or it will not be saved.
Once you do this, you will receive a warning:

The save changes dialog warns that these changes will cause your application to restart. Once your application restarts, it will have access to the new configuration value.
Nested key values
In our appsettings.json and secrets.json files, we can have nested settings for organizational purposes. This is usually represented like this:
{
    "MyConfigValues":{
        "Passkey":"secret value"
    }
}
In code, we access this value using the Configuration object like this:
string Passkey = Configuration["MyConfigValues:Passkey"];
The nesting is accessible using the ':' colon character as a delimiter.
In contrast to the json configuration nesting, the Azure portal is a bit different. To store the value as a nested value, use two __ underscore characters to seperate the parent and child.

To retrieve the value in code, no changes will need to be made as the code in C# still uses a ':' colon character to delimit the parent and the child.
string Passkey = Configuration["Nested:Secret"];
Azure Key Vault
While using configuration settings in Azure App Service is a convenient way to store secrets, another way is to use Azure Key Vault. The key vault can be shared across multiple app service instances, function apps and other services. It is a general purpose, secure way to store secrets.
To create a key vault from the Azure portal, search for Key Vault and click the Create button to begin.
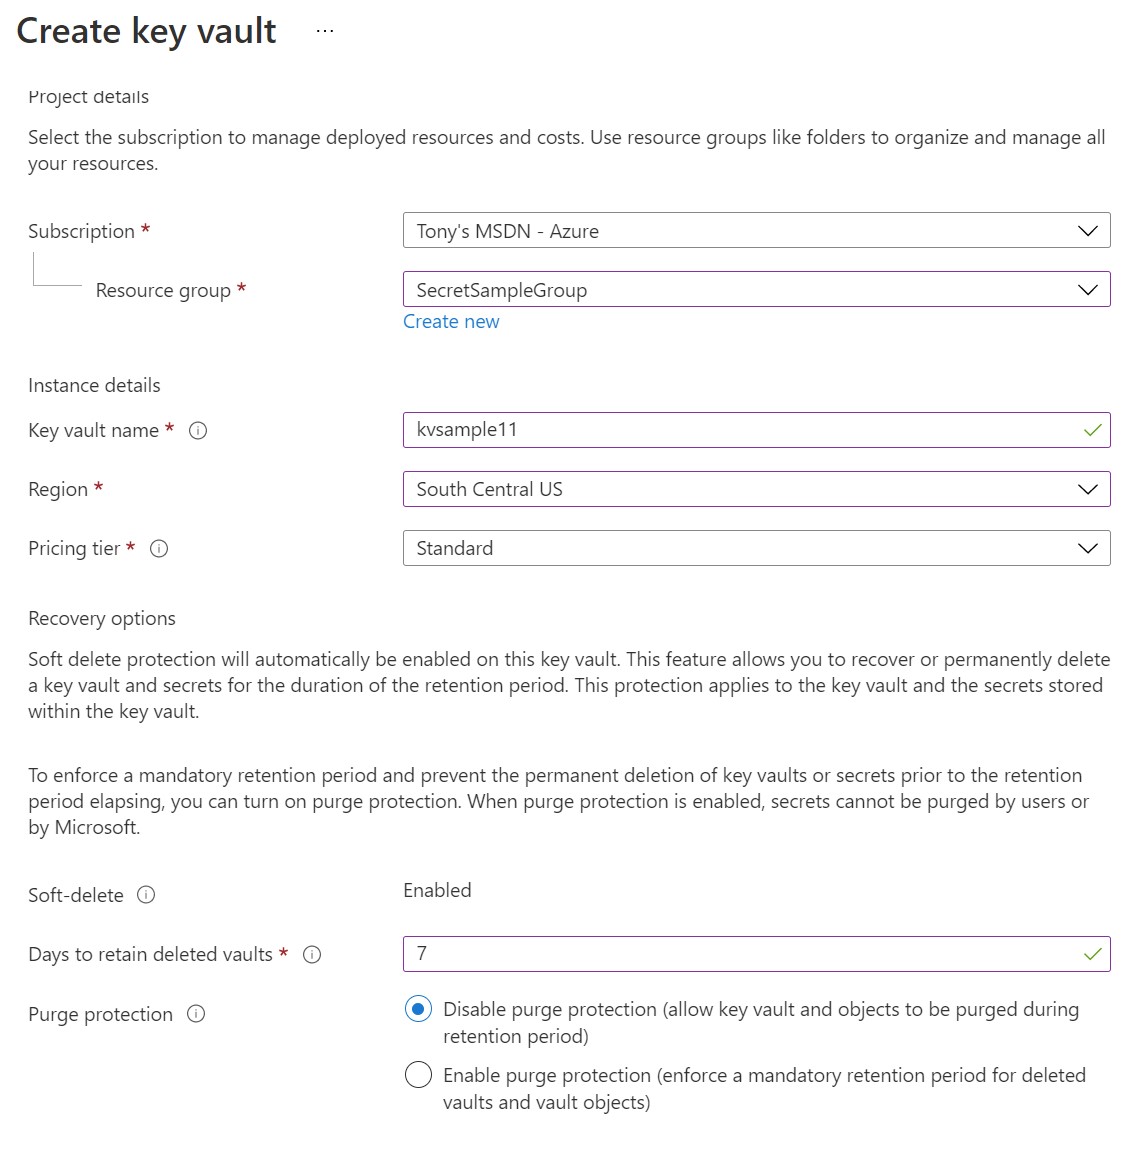
Next you will be presented with the 'create key vault' screen where you select the subscription, resource group and assign a name, region and a pricing tier. For this example, I named my keyvault kvsample11, selected the South Central US region and opted for the Standard pricing tier. Additionally I enabled soft-delete and allowed for 7 days to retain soft delete values. I also disabled purge protection so that a key could be purged even before the 7 days elapsed.
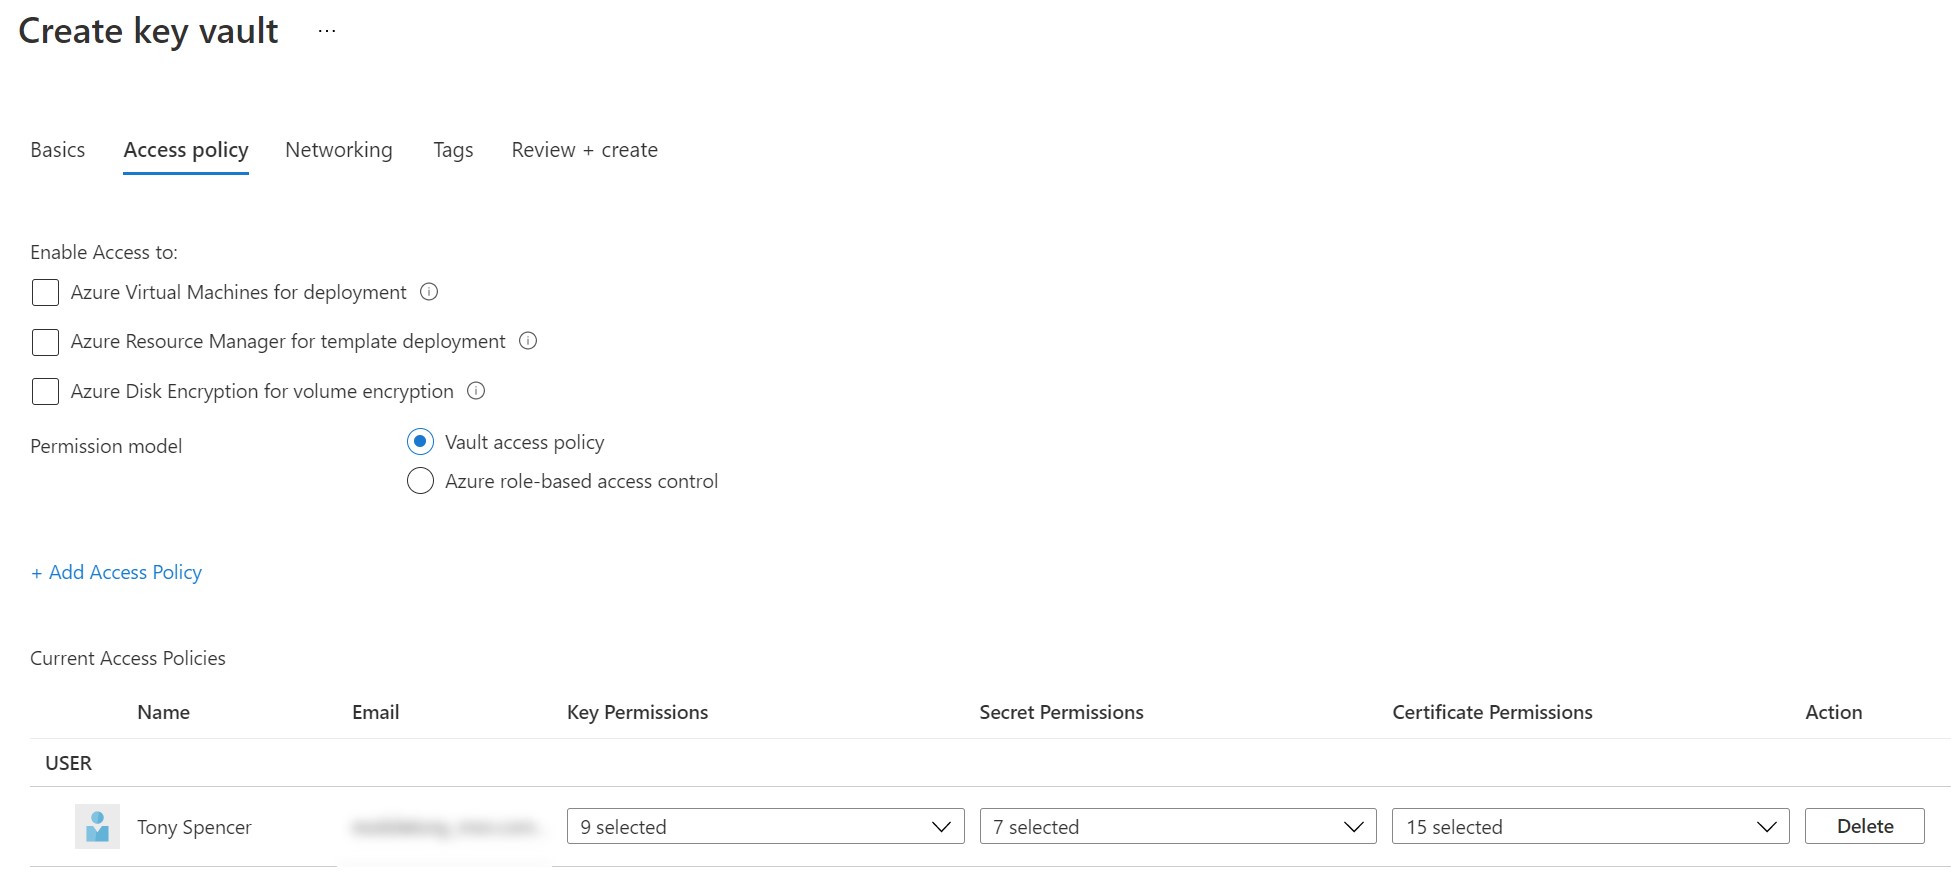
For the next step, setting up access policies, we will leave the default as Vault access policy and click next. Later, we will return to this screen and configure access policies for our application.
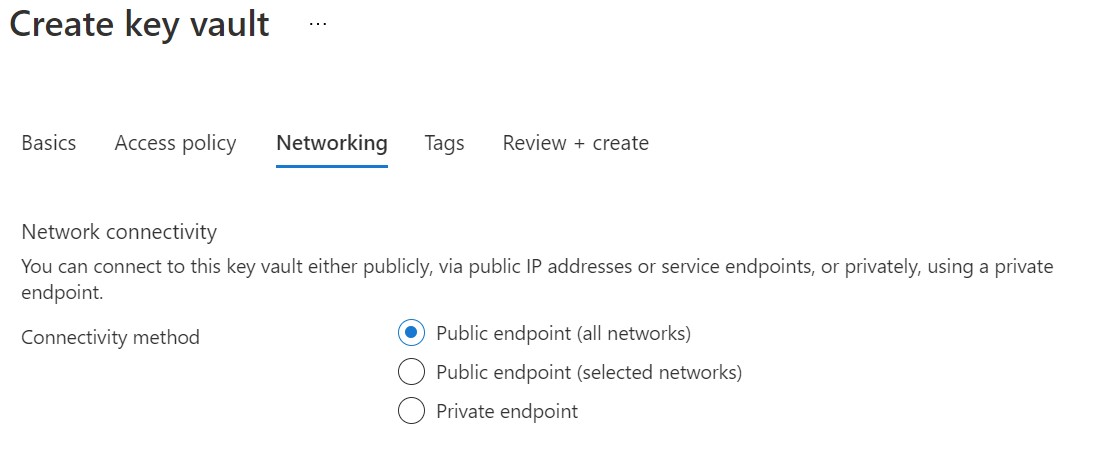
On the Networking tab or step, you can set the connectivity method to match whatever your application needs. In this case, I just set it to a Public endpoint for now.
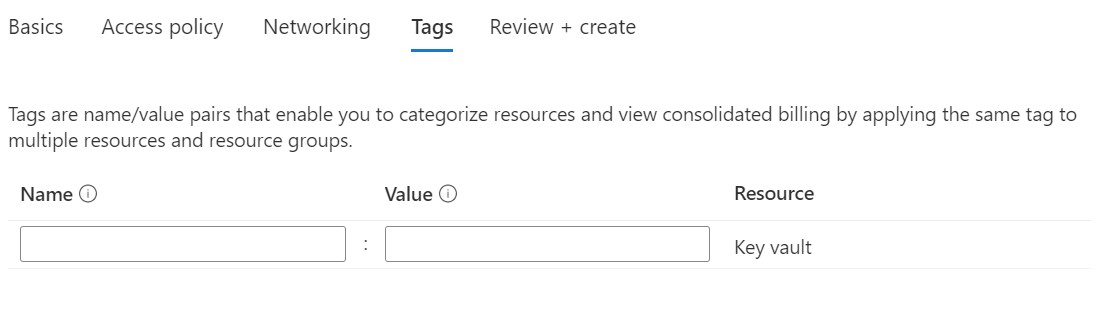
You can add tags to describe the resource or help you find it easier.
Finally, review your settings and when you are ready, click the blue Create button below.
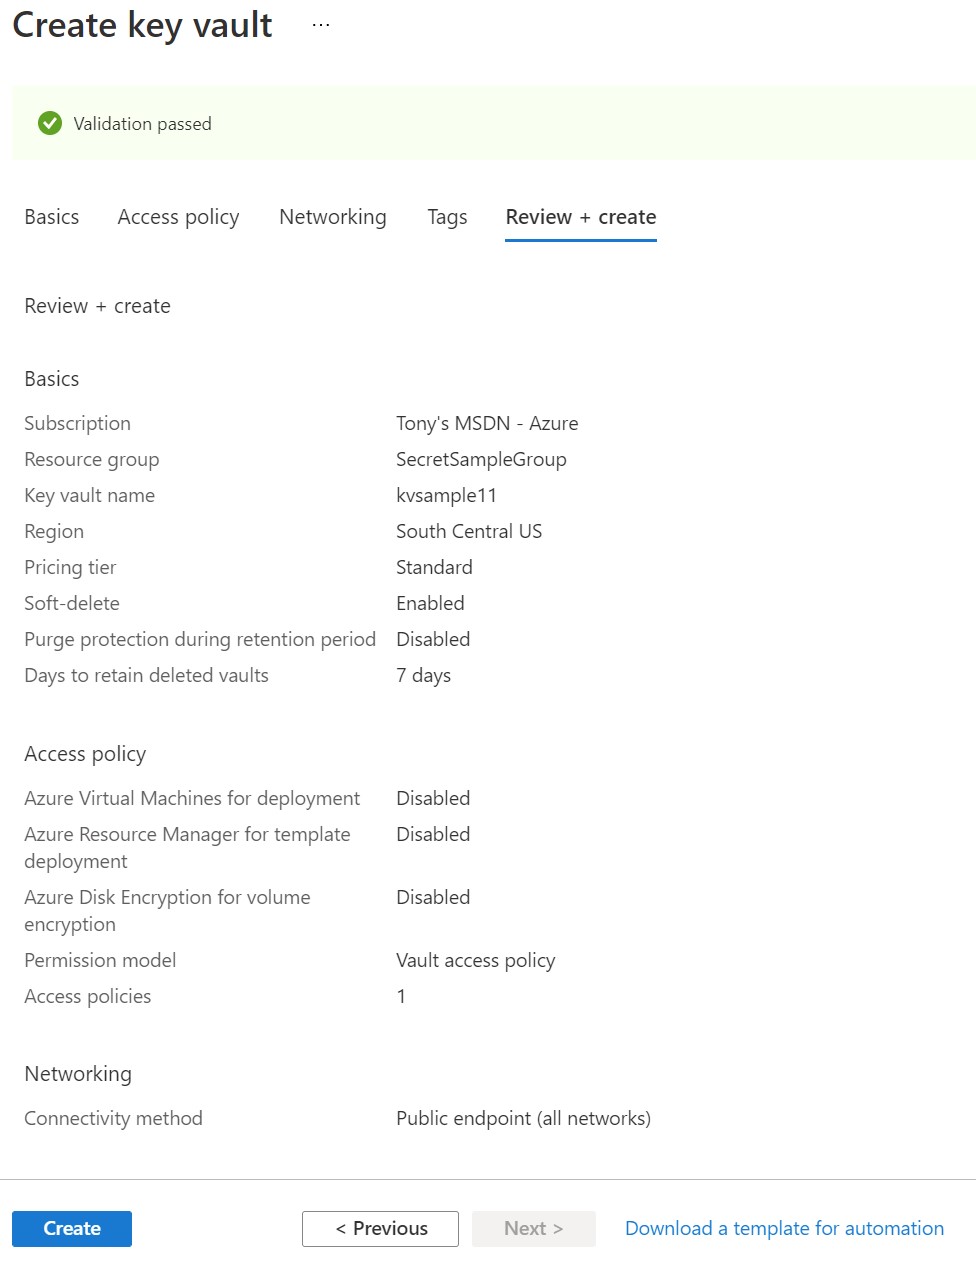
In a few minutes, your new azure key vault will be provisioned and ready.
Setting Access
Before we tackle the next step, we need to talk about how Key Vault is secured and different ways that applications/services can talk to key vault to get secrets from it.
The idea of key vault is to keep secrets out of your code, especially out of your code repository. But how do you access the secrets in the vault?
There are several ways to do this, including setting up (ironically) a username/password combination that you can use to communicate with the key vault. However, this seems to lead back to the same problem we started with, avoiding the storing of secrets with/in your application code.
A better approach is to use an Azure managed identity to access the key vault. This way, Azure can explicitly allow an application (hosted in an app service, for example) to talk to the key vault without needing to pass any secrets, but the application must be approved to communicate with it.
There are several ways to accomplish this, including setting it up through the identity tab in the app service itself, but for the purposes of this tutorial, we will use the Access policies panel of the Key Vault itself.

From the Access policies panel, click the Add Access Policy button.
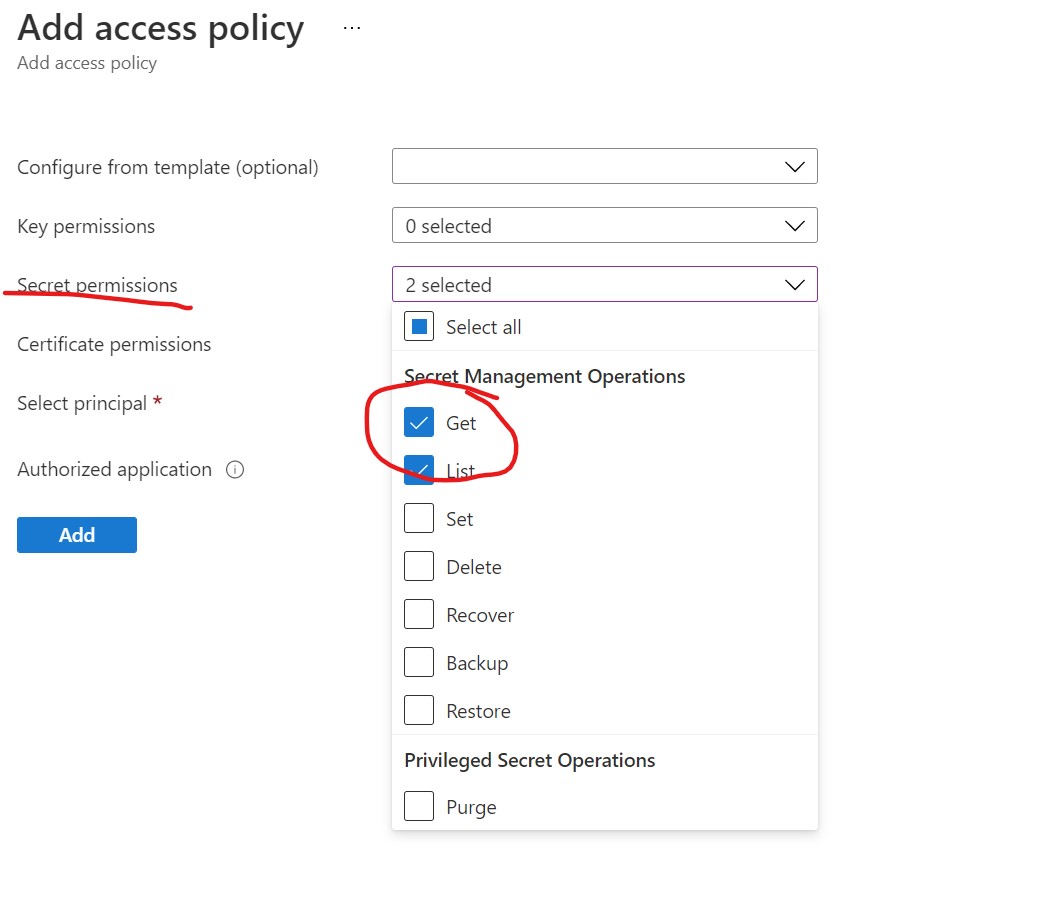
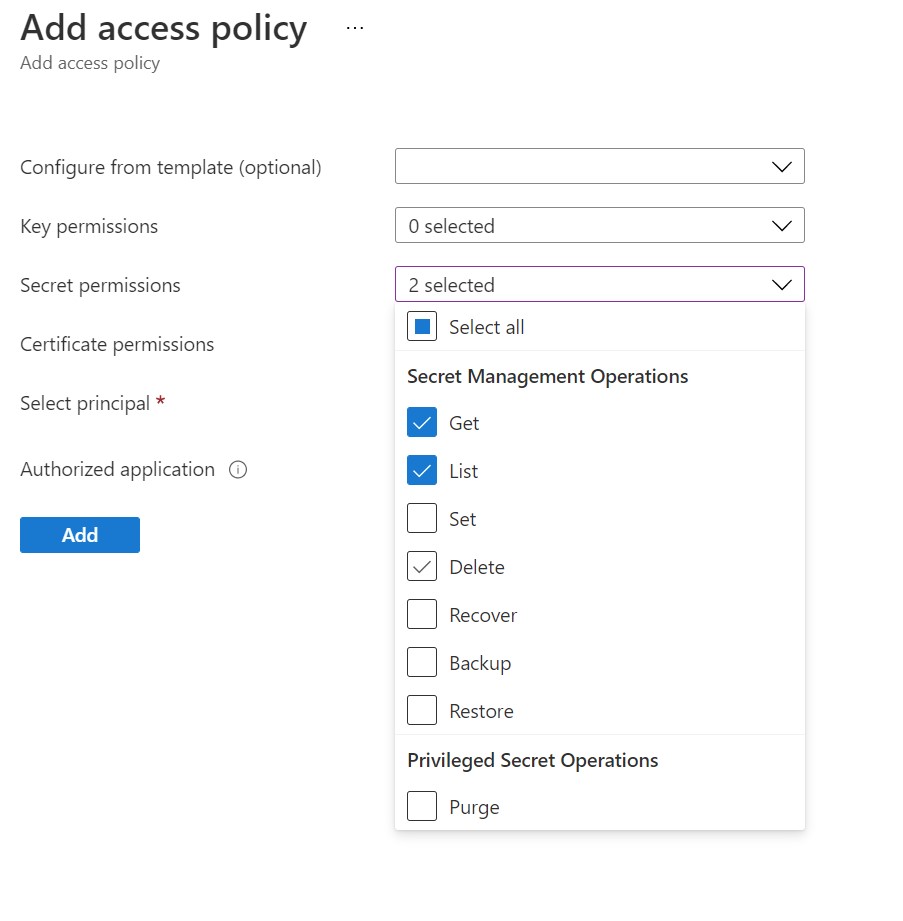
On the add access policy screen, choose Get and List from the drop down box next to Secret permissions.
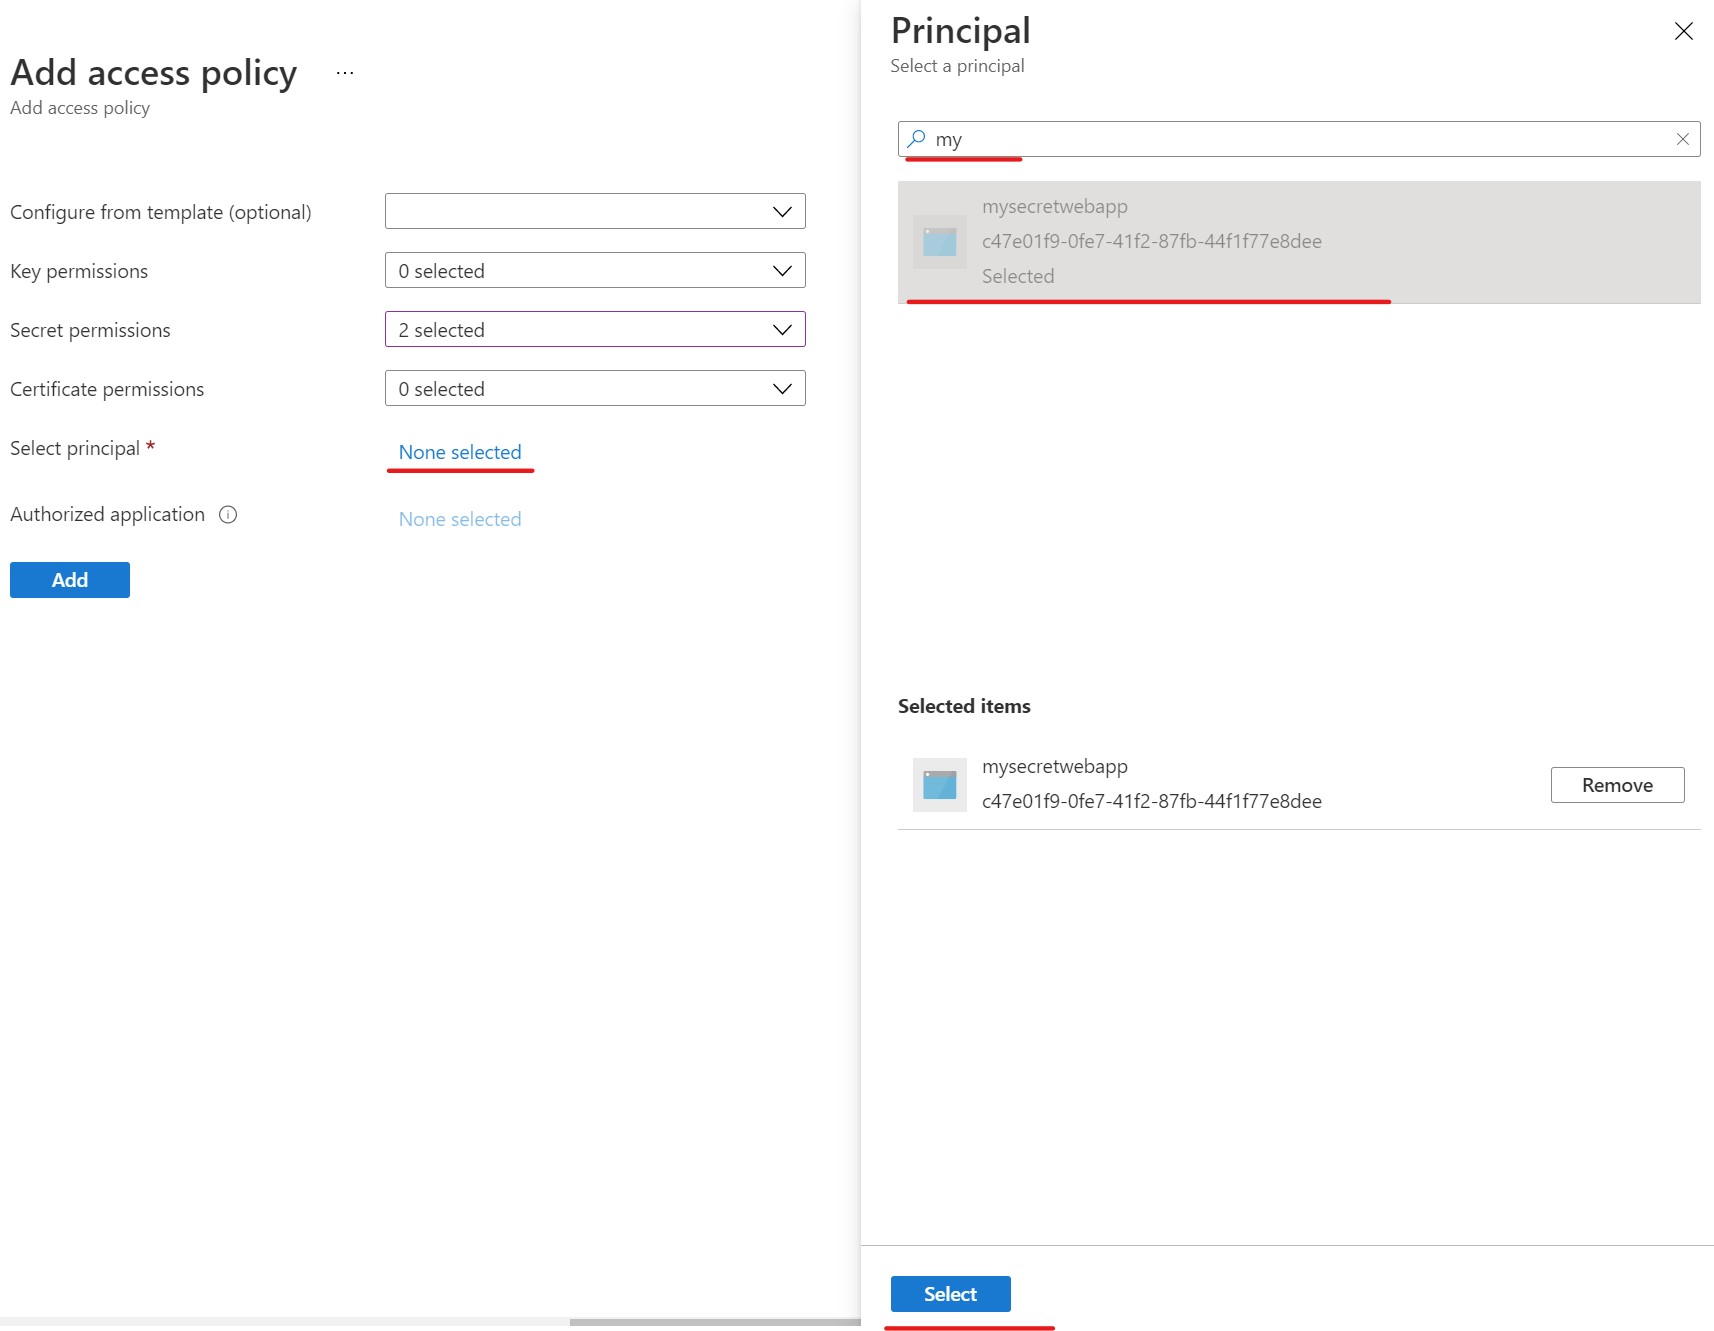
Now, click the None selected link next to Select principal to open the Principal dialog. Then search for the name of your app service (in this case mysecretwebapp), then select it and click the select button.
If you don't see your principal in the dialog, you may need to check the
Identityof the app service.

Click on the
Identitytab for your app service and ensure that the System assigned identity is turned on.
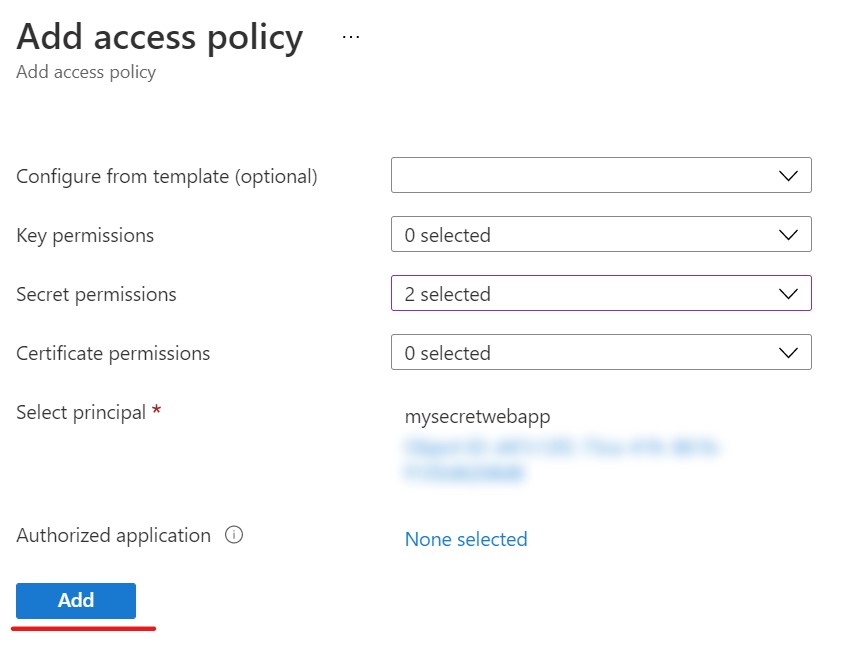
now click the Add button to complete the add policy process.
Add a Secret
Now that we have our access rights assigned to the app service, it is time to populate our key vault with a secret. To do this, go to the Secrets tab in the vertical navigation panel for the key vault and select it.
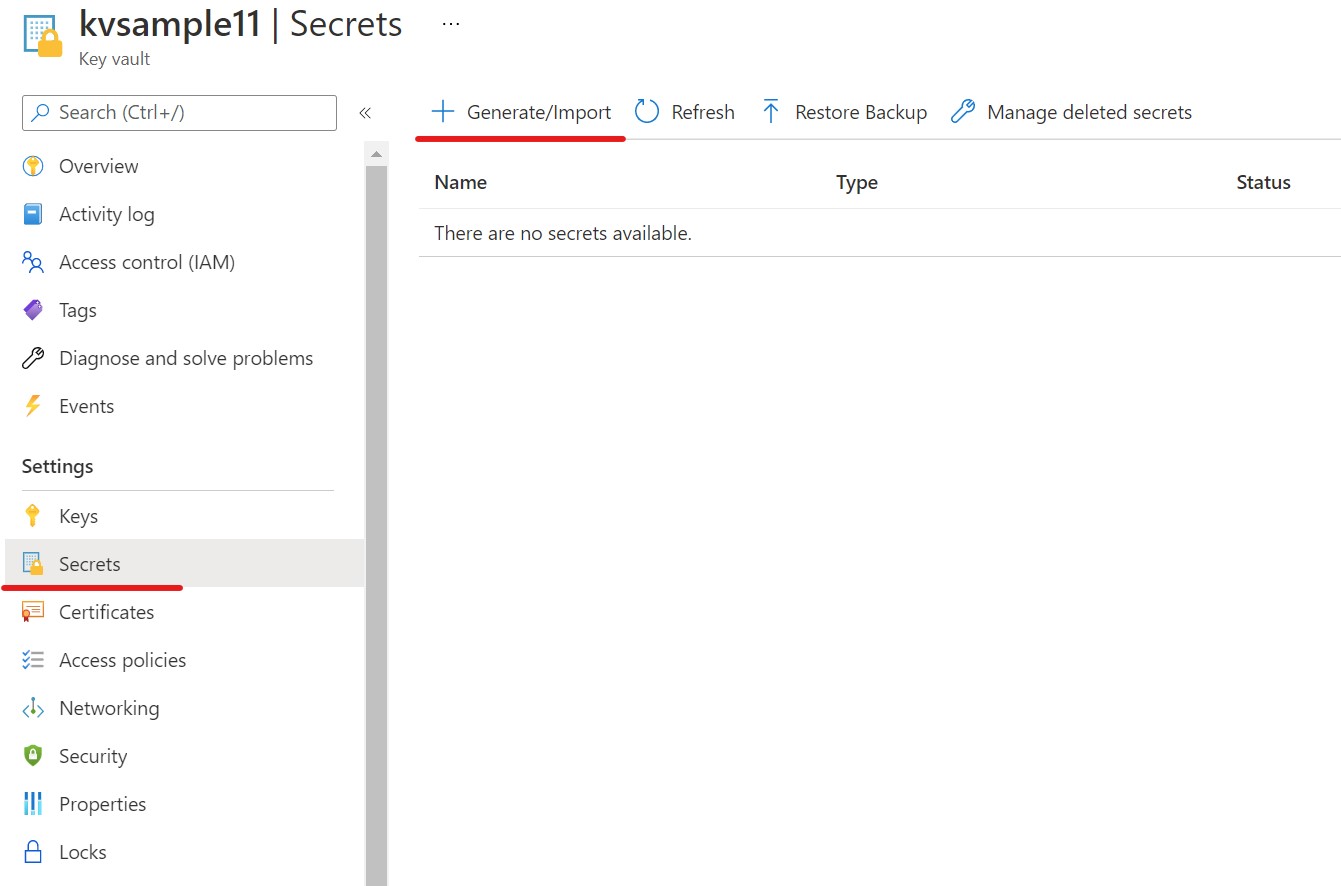
Then click the + Generate/Import button at the top.
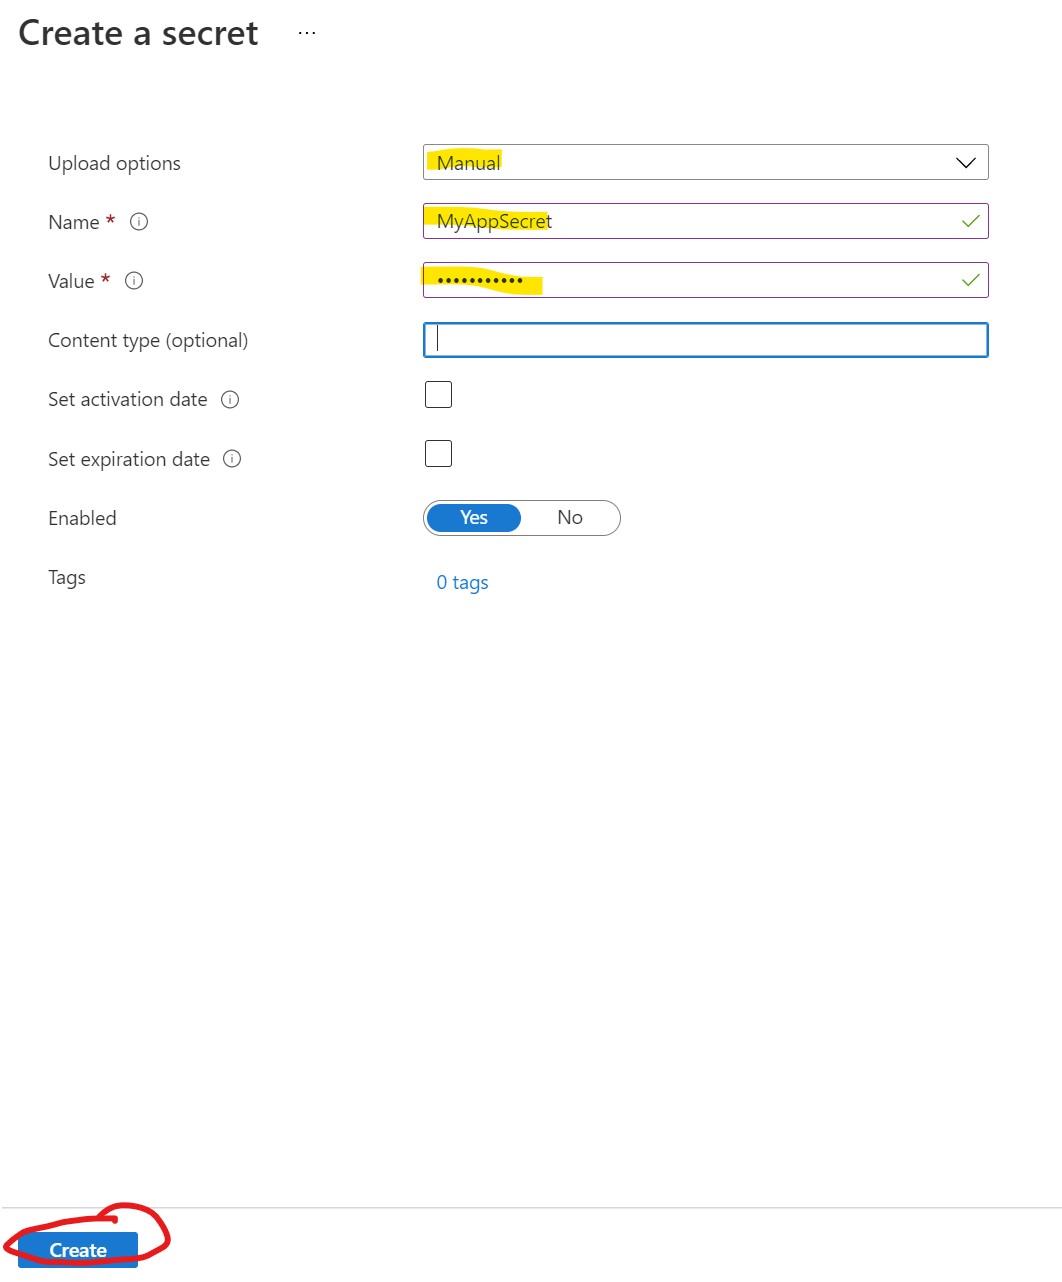
On the Create a secret screen, select Manual. Then, give the secret a name, in this case MyAppSecret and a value, like fluFFyC@t35!, or something fun. Then click Create.
This will add a secret that we can later pull into our application when deployed to our Azure App service.
Install the packages
Return to our sample app, From the terminal window, install the Azure Key Vault secret client library for .NET and Azure Identity client library packages:
dotnet add package Azure.Identity
dotnet add package Azure.Security.KeyVault.Secrets
Additionally, you can use the Manage nuget packages GUI, if you prefer, by right clicking the project and choose Manage nuget packages
Update The Code
Find and open the HomeController.cs file in your MyWebApp project. (The MyWebApp project was created in a previous article about AspNetCore UserSecrets).
Add these lines to the header:
using Azure.Identity;
using Azure.Security.KeyVault.Secrets;
using Azure.Core;
Next, add this following private method to the bottom of the HomeController class. This code just wraps the essential elements needed to call the KeyVault instance.
private string GetSecret(string vaultName, string secretKey)
{
    try
    {
        SecretClientOptions options = new SecretClientOptions()
        {
            Retry =
            {
                Delay= TimeSpan.FromSeconds(2),
                MaxDelay = TimeSpan.FromSeconds(16),
                MaxRetries = 5,
                Mode = RetryMode.Exponential
            }
        };

        var client = new SecretClient(
            new Uri($"https://{vaultName}.vault.azure.net/"),
            new DefaultAzureCredential(),
            options);
        KeyVaultSecret secret = client.GetSecret(secretKey);
        string secretValue = secret.Value;
        return secretValue;
    }catch(Exception ex)
    {
        // you may want to log the exception message, or handle the error in a different way
        return string.Empty;
    }
}
Then add the following line into the Index action:
ViewData["Secret"]= GetSecret("kvsample11", "MyApp-Secret");
so that it looks like this:
public IActionResult Index()
{
    ViewData["Secret"]=GetSecret("kvsample11", "MyApp-Secret");
    return View();
}
We are stuffing the secret into a ViewData collection so we can access it in the view and display it.
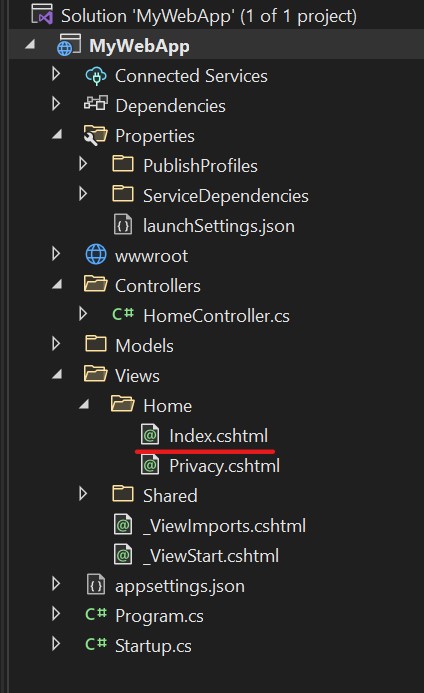
Now find the associated view for the Index action (Index.cshtml) in the solution explorer as depicted in the screenshot below and edit it:
At the top of the screen just below the ViewData["Title"] line, add the following line of code:
var secret = ViewData["Secret"];
Then in the body add this code:
<h2>Secret: @secret</h2>
So the entire view looks like this:
@inject Microsoft.Extensions.Configuration.IConfiguration configuration
@{
ViewData["Title"] = "Home Page";
var secret = ViewData["Secret"];
}
<div class="text-center">
<h1 class="display-4">Welcome</h1>
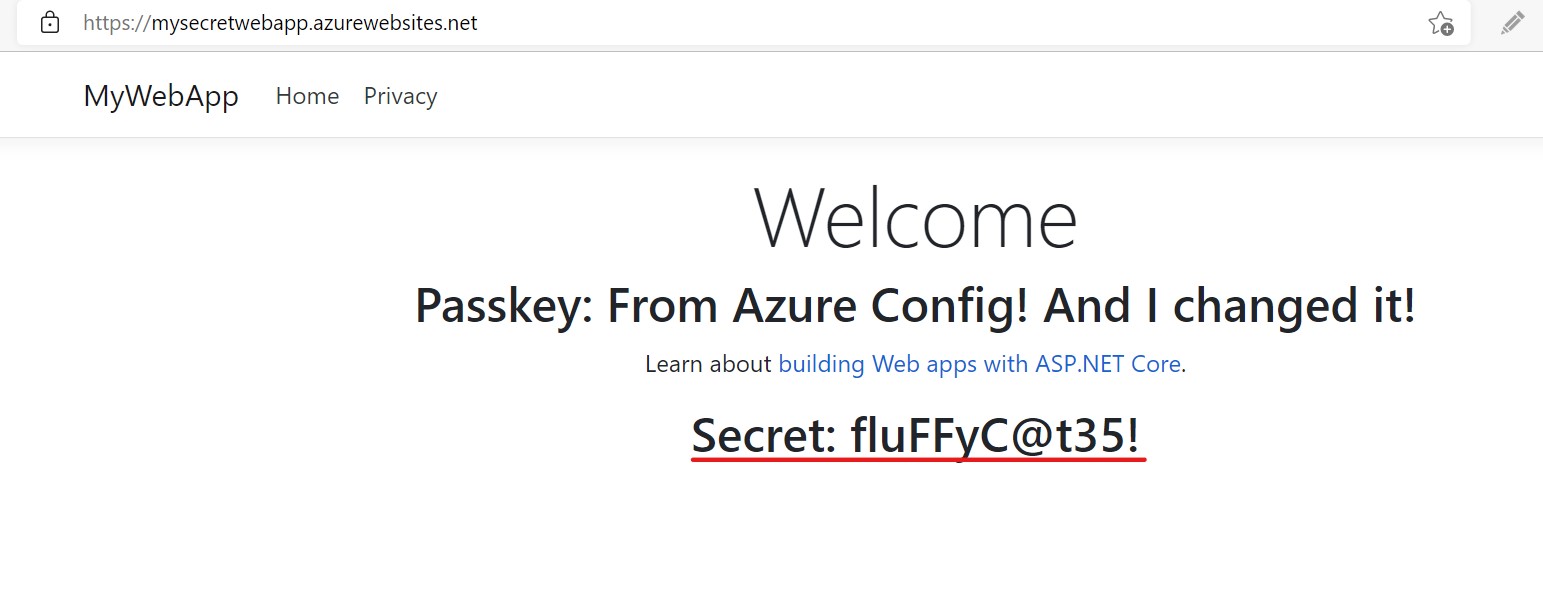
<h2>Passkey: @configuration["Passkey"]</h2>
<p>Learn about <a href="https://docs.microsoft.com/aspnet/core">building Web apps with ASP.NET Core</a>.</p>
<h2>Secret: @secret</h2>
</div>
When you deploy your application to the app service and hit the site, you will see the secret from keyvault displayed on the screen like this:
Access vaults with a user-assigned identity - Running local in dev
Because we are using Managed Identity in Azure, our application can use Azure Key Vault without needing to store or pass credentials to it. This is a safe way to operate, however, it makes it difficult to run your application and debug locally in your development environment.
To address this issue, you can setup another managed identity with a client_id and client_secret (basically a form of username/password) in Azure Active Directory and assign it access to the KeyVault. Then you need only add the client_id and client_secret into your environment variables on your local dev box and it will work just as it does in the app service. The magic is in the DefaultCredential() method. To learn more about DefaultCredential see this Microsoft document:
Troubleshooting default azure credential authentication issues
Setup Azure AD App Registration
Let's walk through how to setup an app registration and assign that identity to the azure key vault access policy.
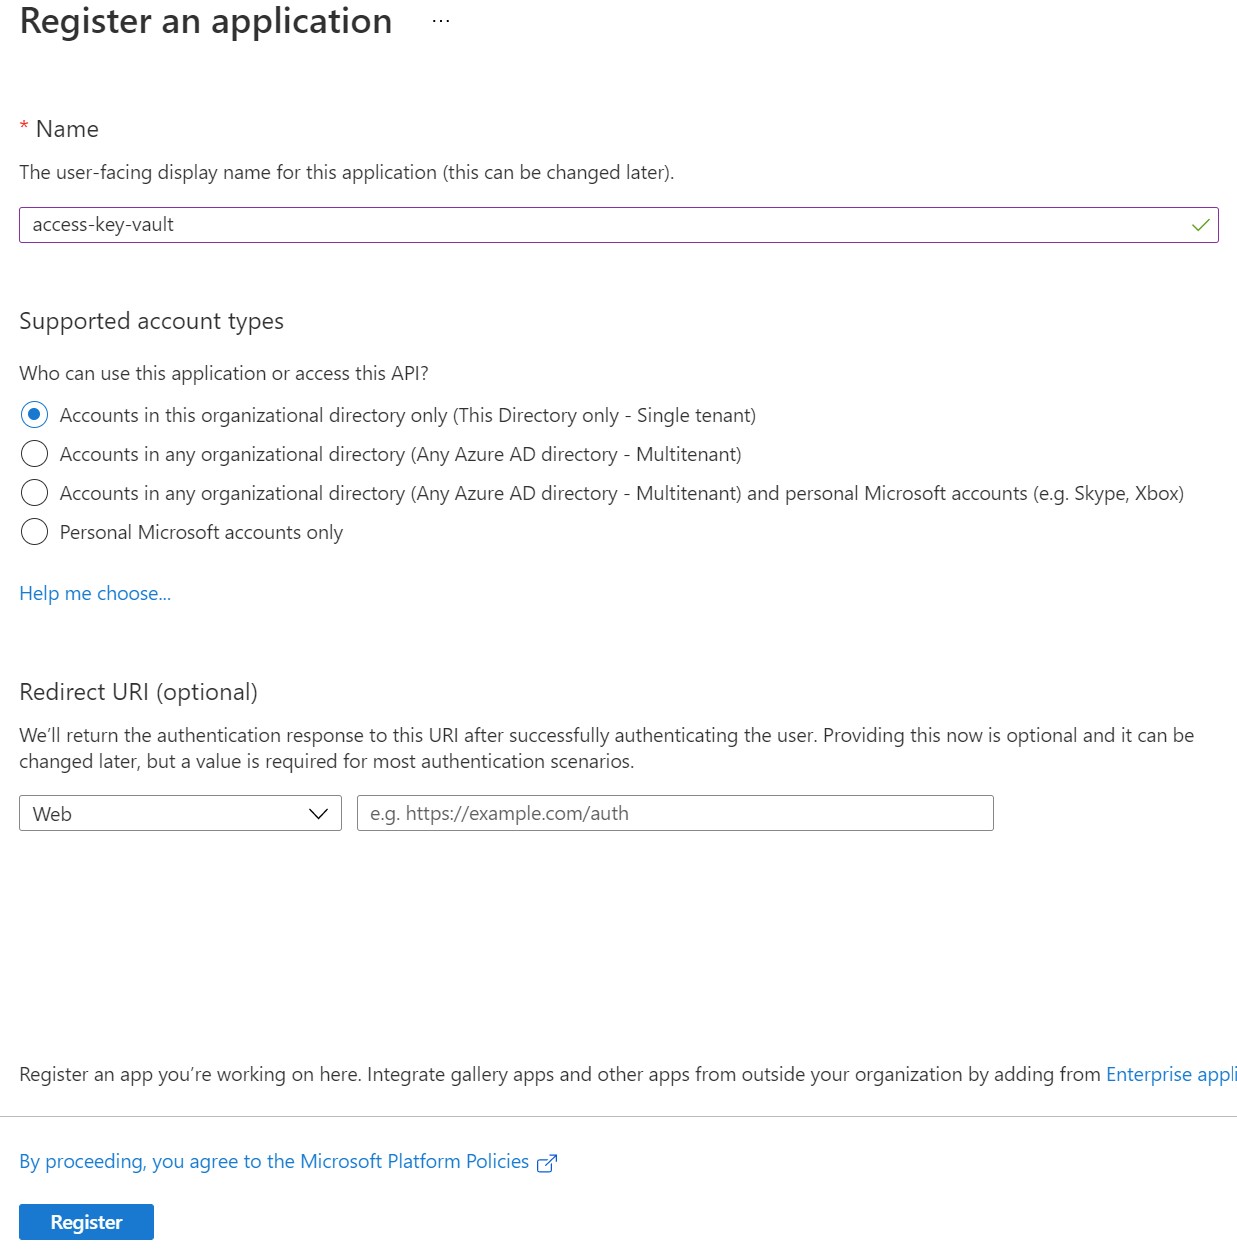
First, go to Azure Active Directory section in the portal and click on App registrations in the left navigation pane. Then click the + New registration link on the top bar.
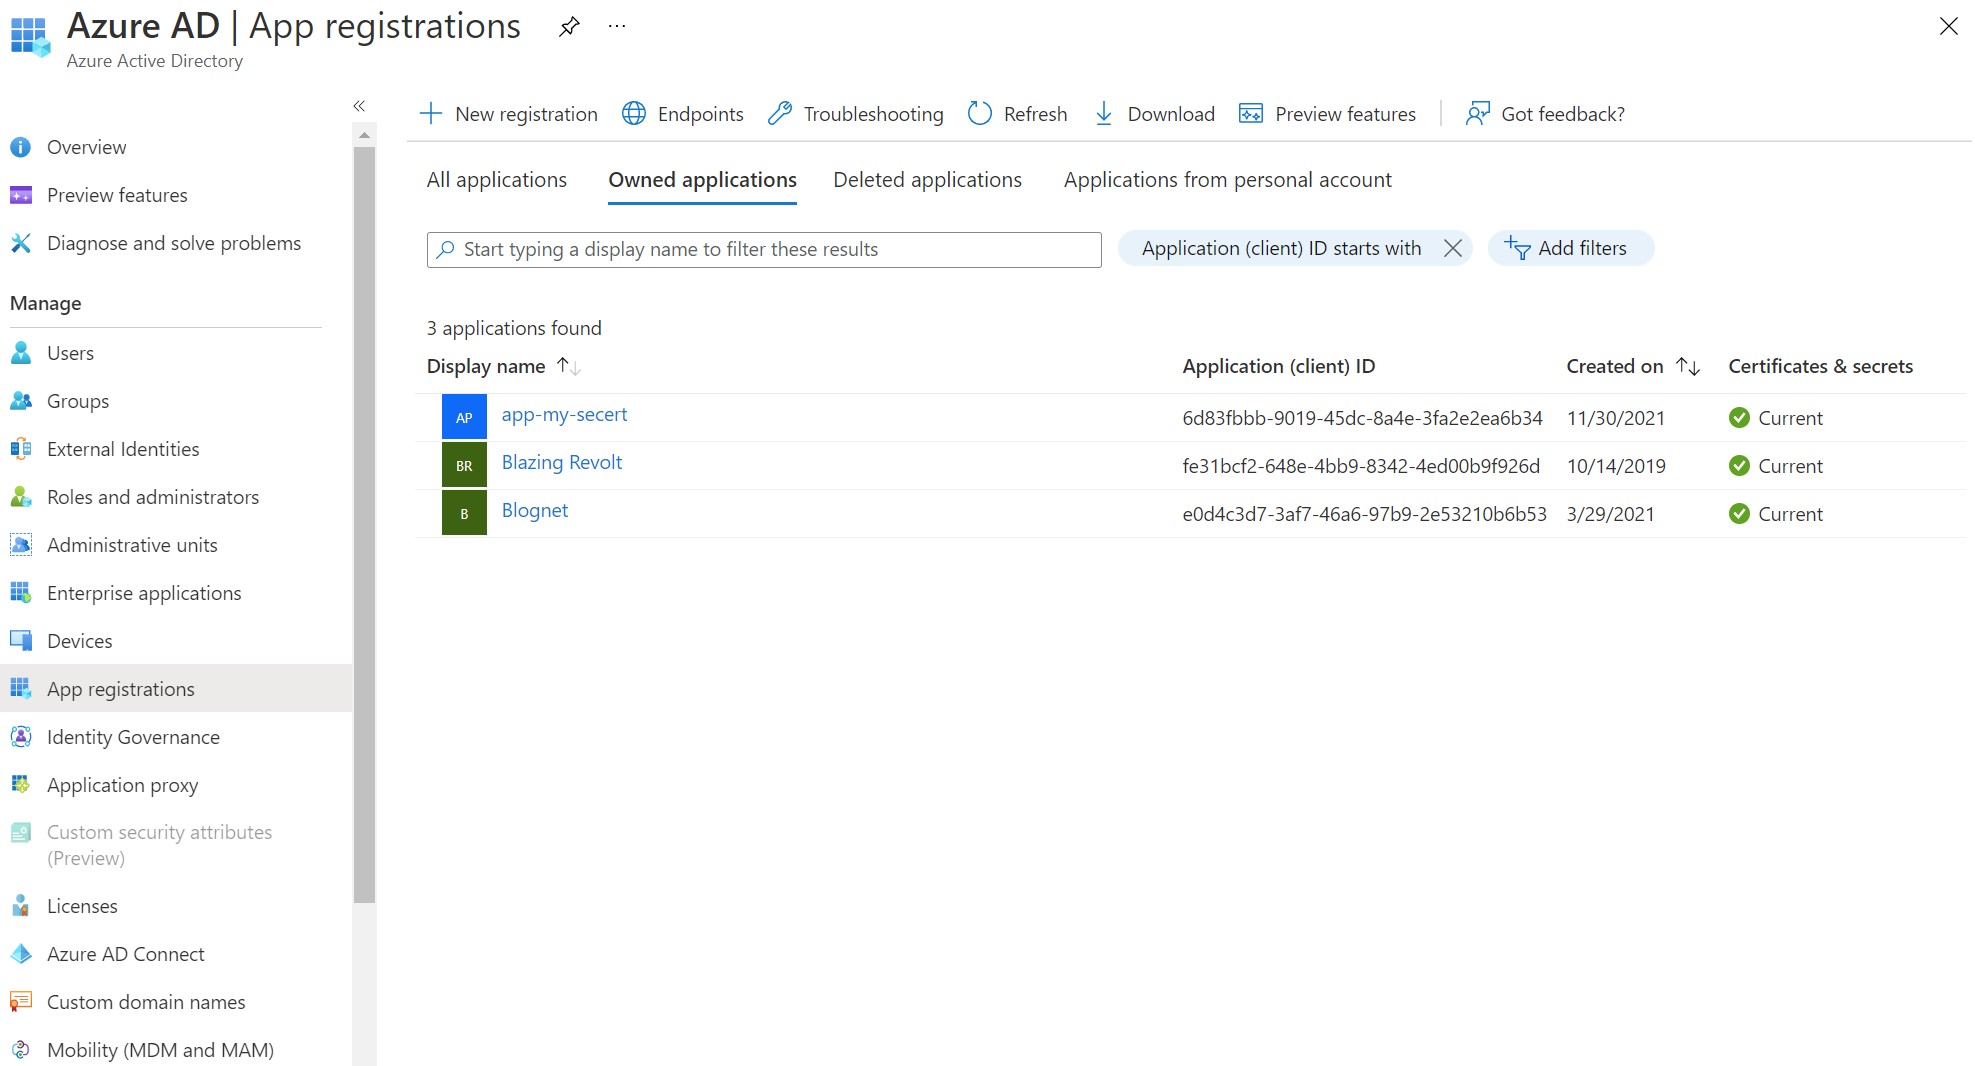
Now add a name to your application. In this case, an application is a bit of a misnomer as we are really only using it to create credentials to access the key vault. I chose the name "access-key-vault", then left all the other defaults as is and clicked Register.
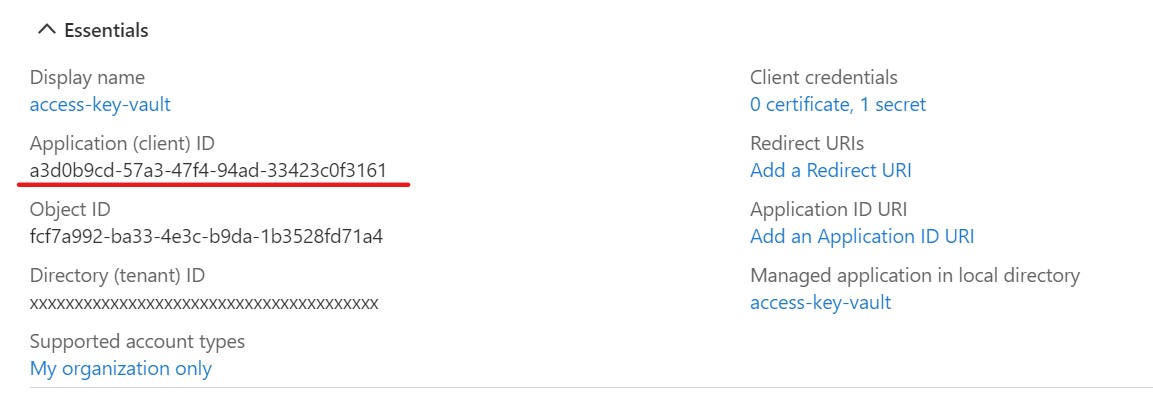
This will add a new app registration to the list. Click the newly added app registration to get details such as the Application (client) ID and copy it. You will also need the Directory (tenant) ID. Save this somewhere for later use.
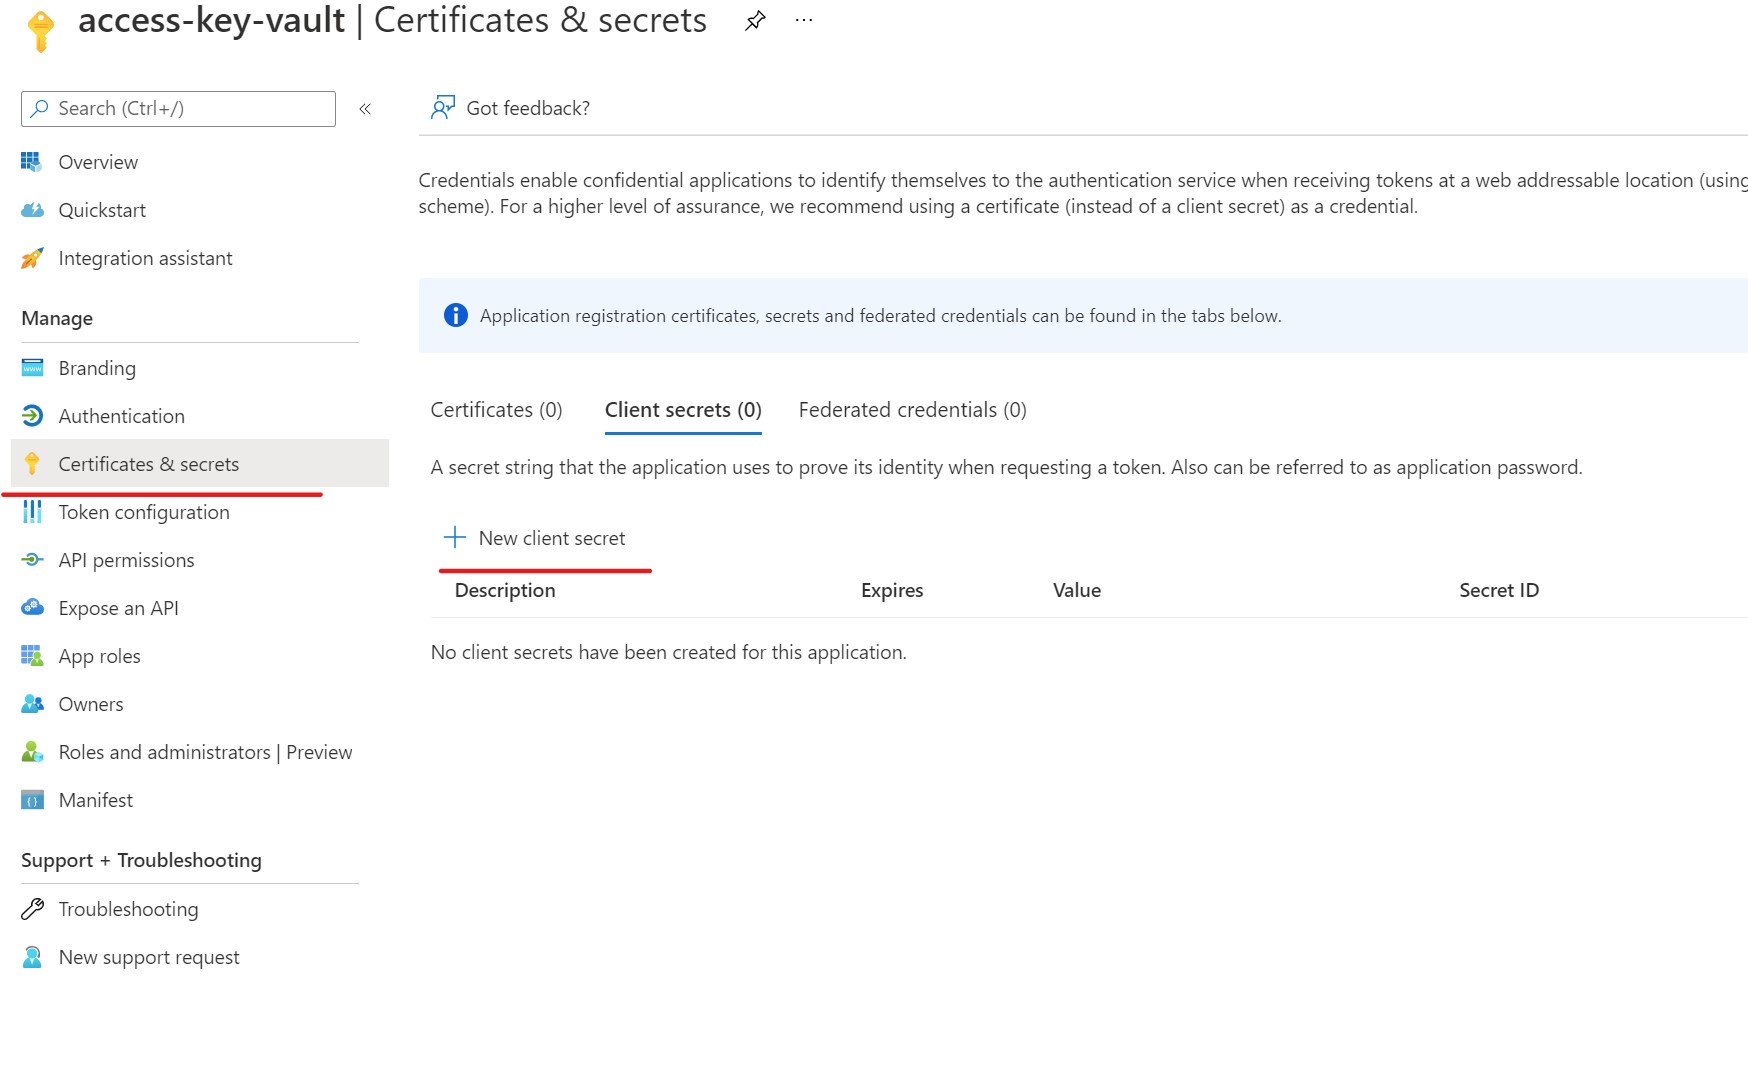
Next, we need to add a secret for the app registrations. Click the Certificates & secrets link in the left nav panel of our app registration. Then click + New client secret.
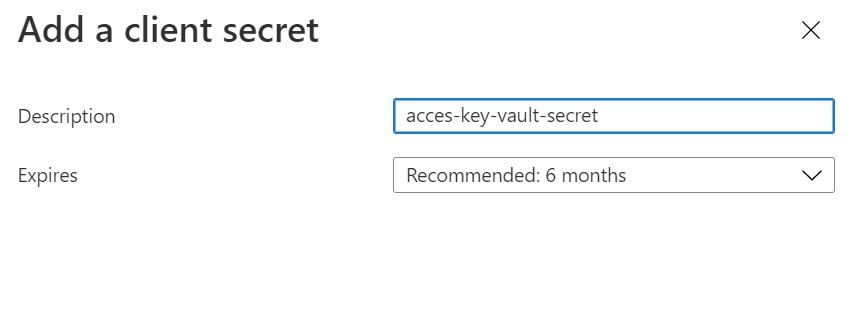
When the "Add a client secret" screen appears, give it a description, such as "access-key-vault-secret" or something like that.
Once it is added you will see a new list for the azure-key-vault-secret.
Important! You will only have one chance to get the Value of the generated secret, so copy it now and put it with your client_id, and tenant_id from early.

Now return to the Key Vault instance ( in our case, kvsample11 ) and click on the "Access policies" link on the left. We will then click the + Add Access Policy link in the middle of the page.
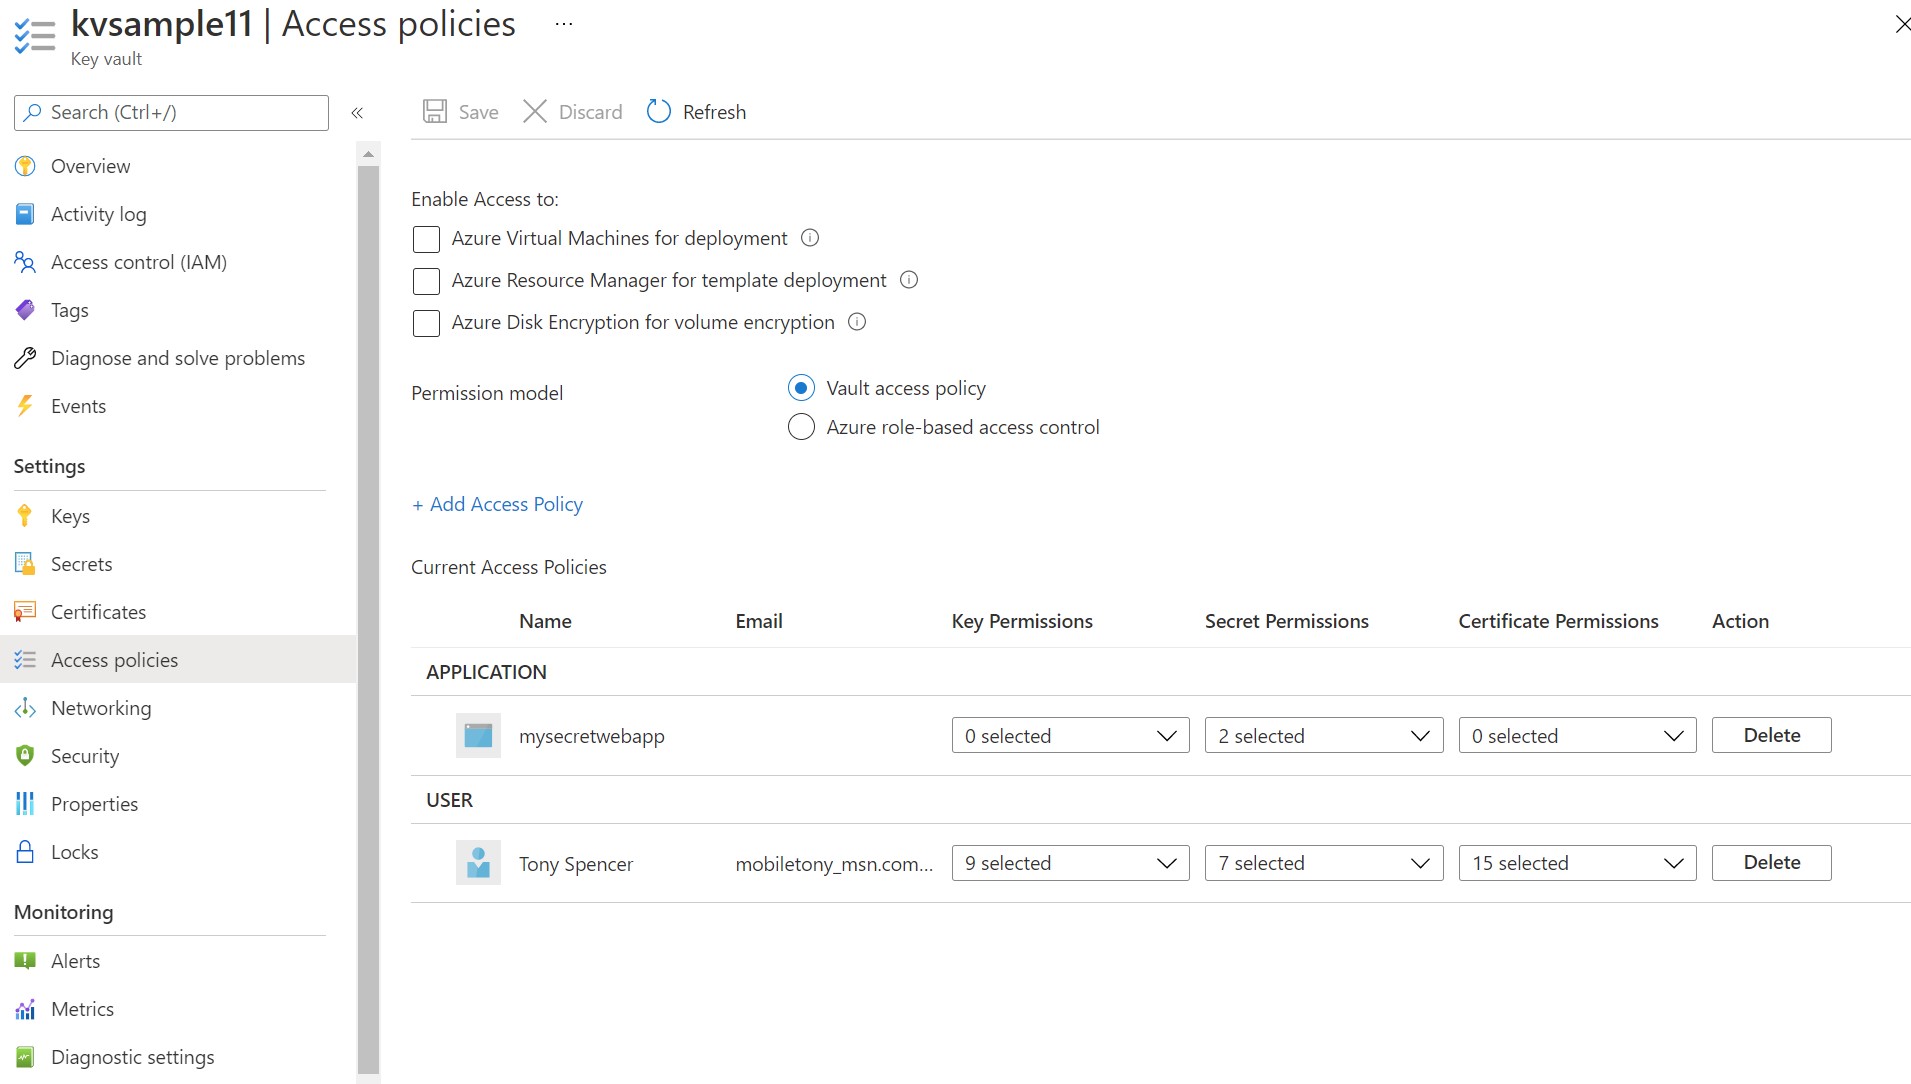
Like we did earlier, we will select the permissions (Get & List) under the "Secret permissions" drop down list.
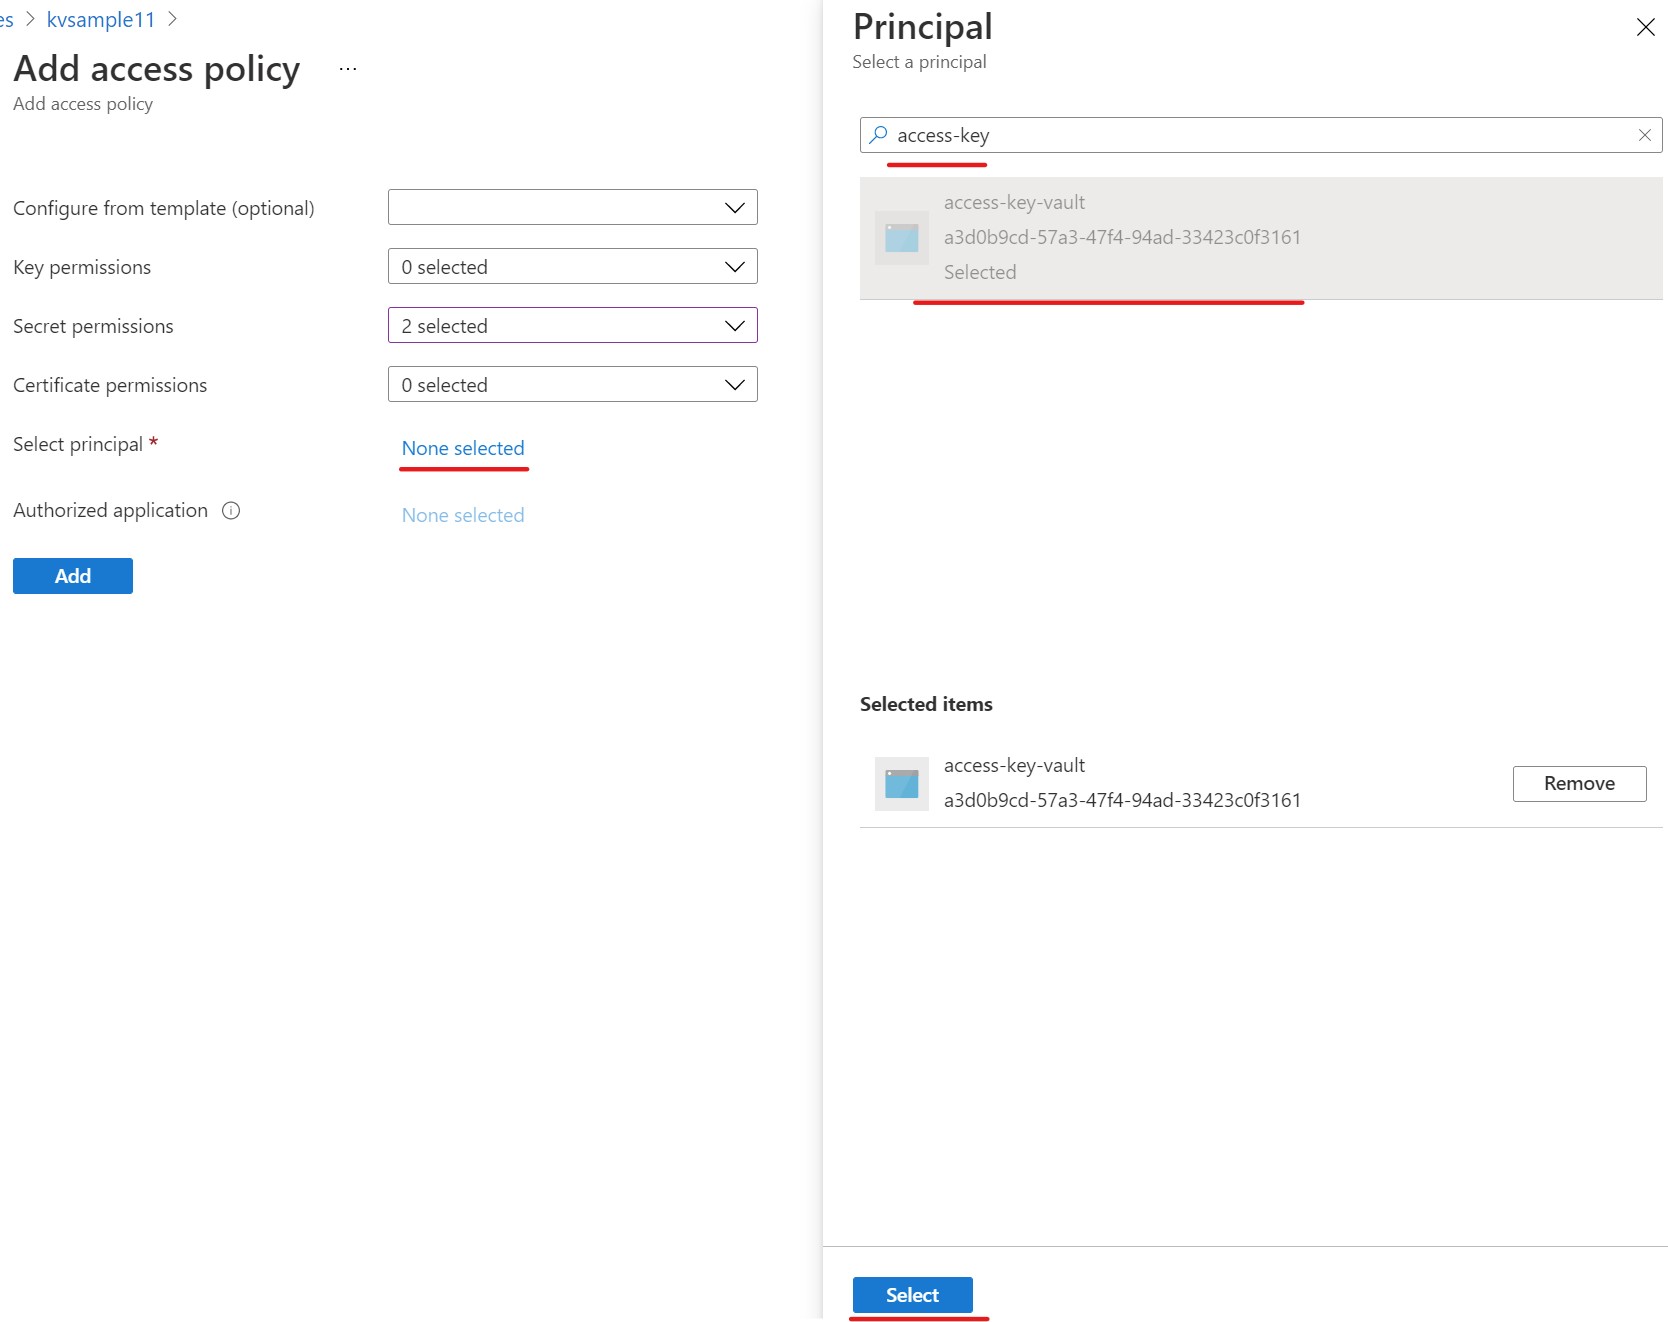
Then click the "Select principal - None selected" link to launch the "Select a principal" dialog window. Then search for the name of our new app registration (access-key-vault in our case) and select it. Then click the Select button.
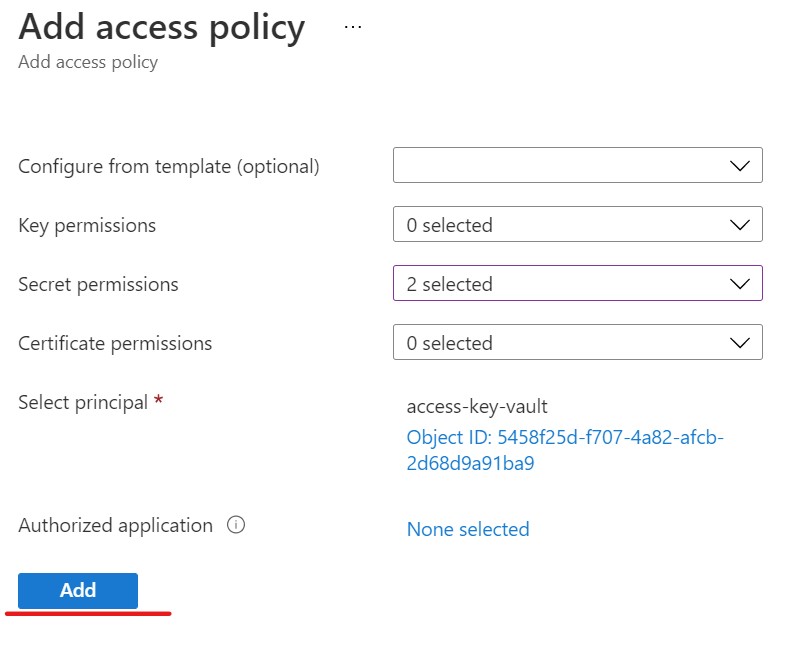
After returning to the Add access policy screen, click the Add button.
Once the policy has been added, the next step is to add the keys/secrets for this credential into the Environment Variables of the dev computer you are wanting to grant Key Vault access to.
The values you need to store in Environment Variables are the client_id, client_secret and the tenant_id.
"AZURE_CLIENT_ID": "a3d0b9cd-57a3-47f4-94ad-33423c0f3161"

"AZURE_CLIENT_SECRET": "dDZ7Q~E7cPMrI~i1BRM9PYSHijXu_Xr0jcrZt"

"AZURE_TENANT_ID": "7ac7b30a-30c7-43df-8be7-0bb7521ad761"
From an administrator command prompt you can use the setx command to see current Environment Variables. To assign a configuration value such as our passkey, you would run the setx command like this:
setx AZURE_CLIENT_ID a3d0b9cd-57a3-47f4-94ad-33423c0f3161 /M

setx AZURE_CLIENT_SECRET dDZ7Q~E7cPMrI~i1BRM9PYSHijXu_Xr0jcrZt /M

setx AZURE_TENANT_ID 7ac7b30a-30c7-43df-8be7-0bb7521ad761 /M
If you need to remove a value, unfortunately the setx command doesn't support a delete option. Instead, use the REG delete command like this:
REG delete "HKLM\SYSTEM\CurrentControlSet\Control\Session Manager\Environment" /F /V AZURE_CLIENT_ID

REG delete "HKLM\SYSTEM\CurrentControlSet\Control\Session Manager\Environment" /F /V AZURE_CLIENT_SECRET

REG delete "HKLM\SYSTEM\CurrentControlSet\Control\Session Manager\Environment" /F /V AZURE_TENANT_ID
Now when you run you application on your dev box, it should be able to access the secure key vault and retrieve the secrets just as it would from azure, allowing you to test your code locally all while maintaining the ability to keep those secrets out of your code repository.